A leak almost never shows up where it enters. A real inspection on a seventh-floor Manhattan apartment: what the dried residue at two bottom corners says, how a window is supposed to drain, the finding that was probably not the window, and the six steps from glazing-stop removal and water test to repair.
In short: A window that leaks almost never leaks where the water shows up. The stain is on the sill or the baseboard; the entry point is a gasket corner, a blocked drain hole or an open frame joint somewhere above or outside. So a leak inspection is not a look at the wet spot and a tube of caulk. It is a visual survey of the interior that reads the pattern of the residue, a short list of the places that fail on that type of window, and then a water test and a glazing-stop removal before anyone decides on a repair. Below is how we did this on a seventh-floor apartment in Upper Manhattan this month: a large fixed aluminum window with a mullion and an operable vent, dried water residue at both bottom corners of the big lite, and a plan that starts with finding the entry point rather than sealing the symptom.
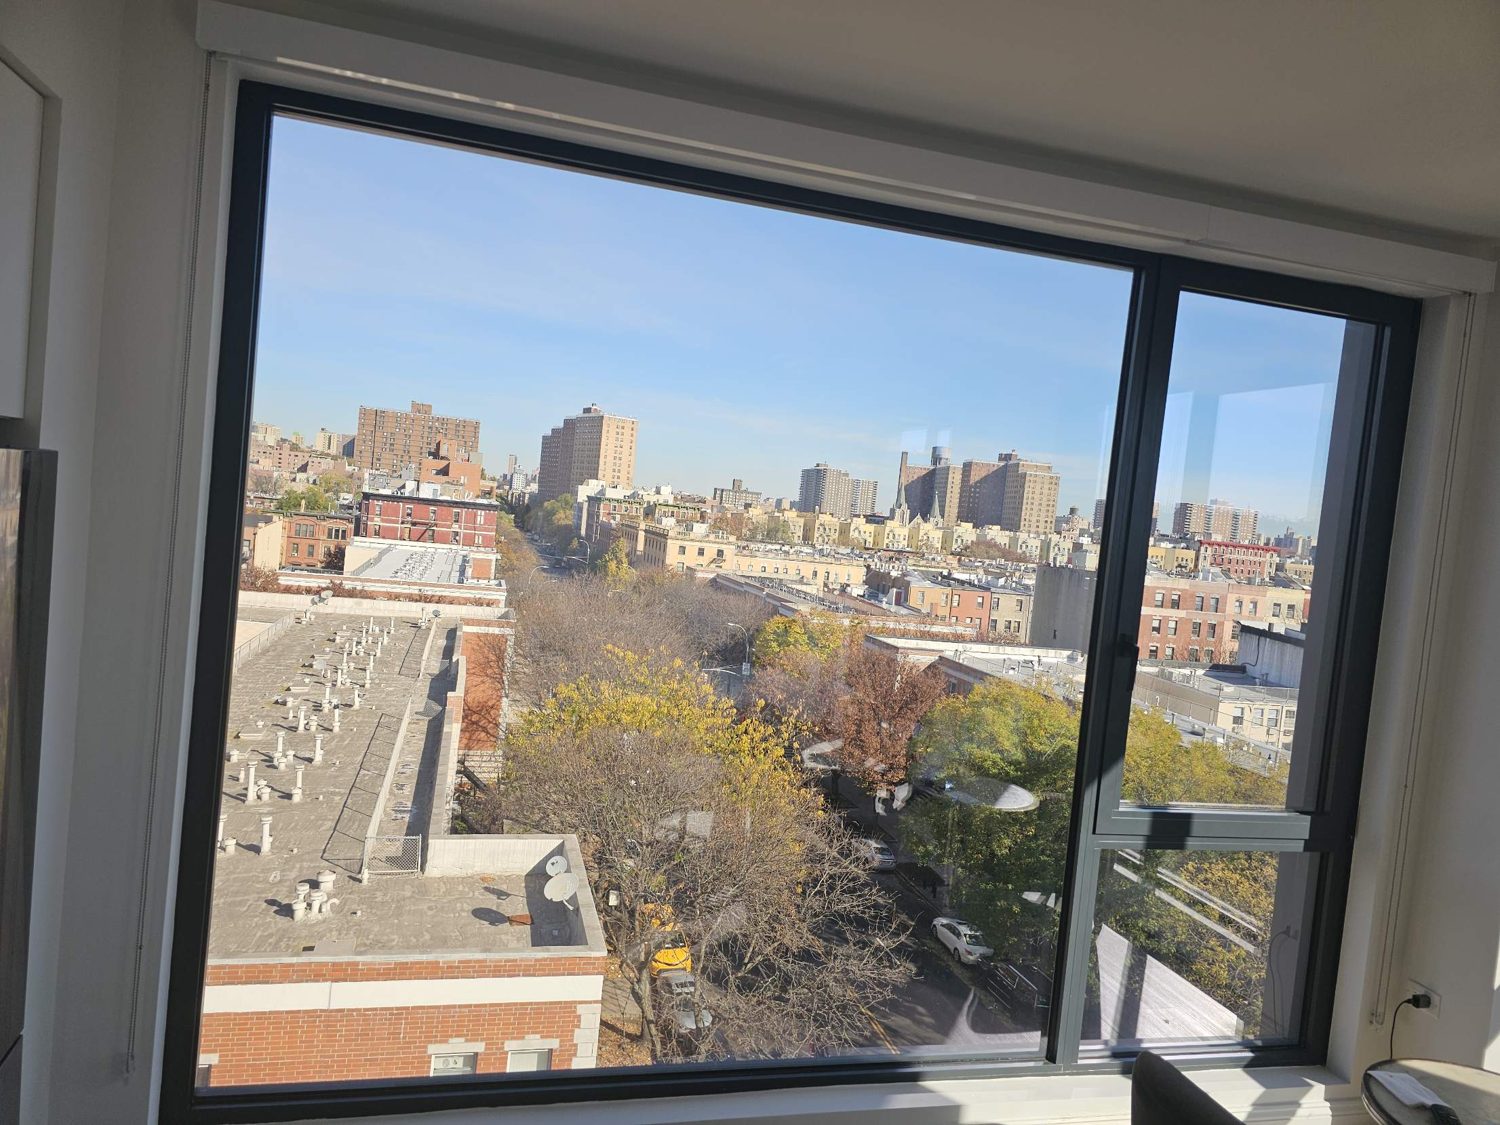
The report from the tenant was "water leaking at the large window frame in the living room." On the day we visited the window was dry, which is the usual case; leaks happen in wind-driven rain and the inspector arrives on a clear afternoon. The evidence is what the water left behind, and it tells a story if you read it in order:
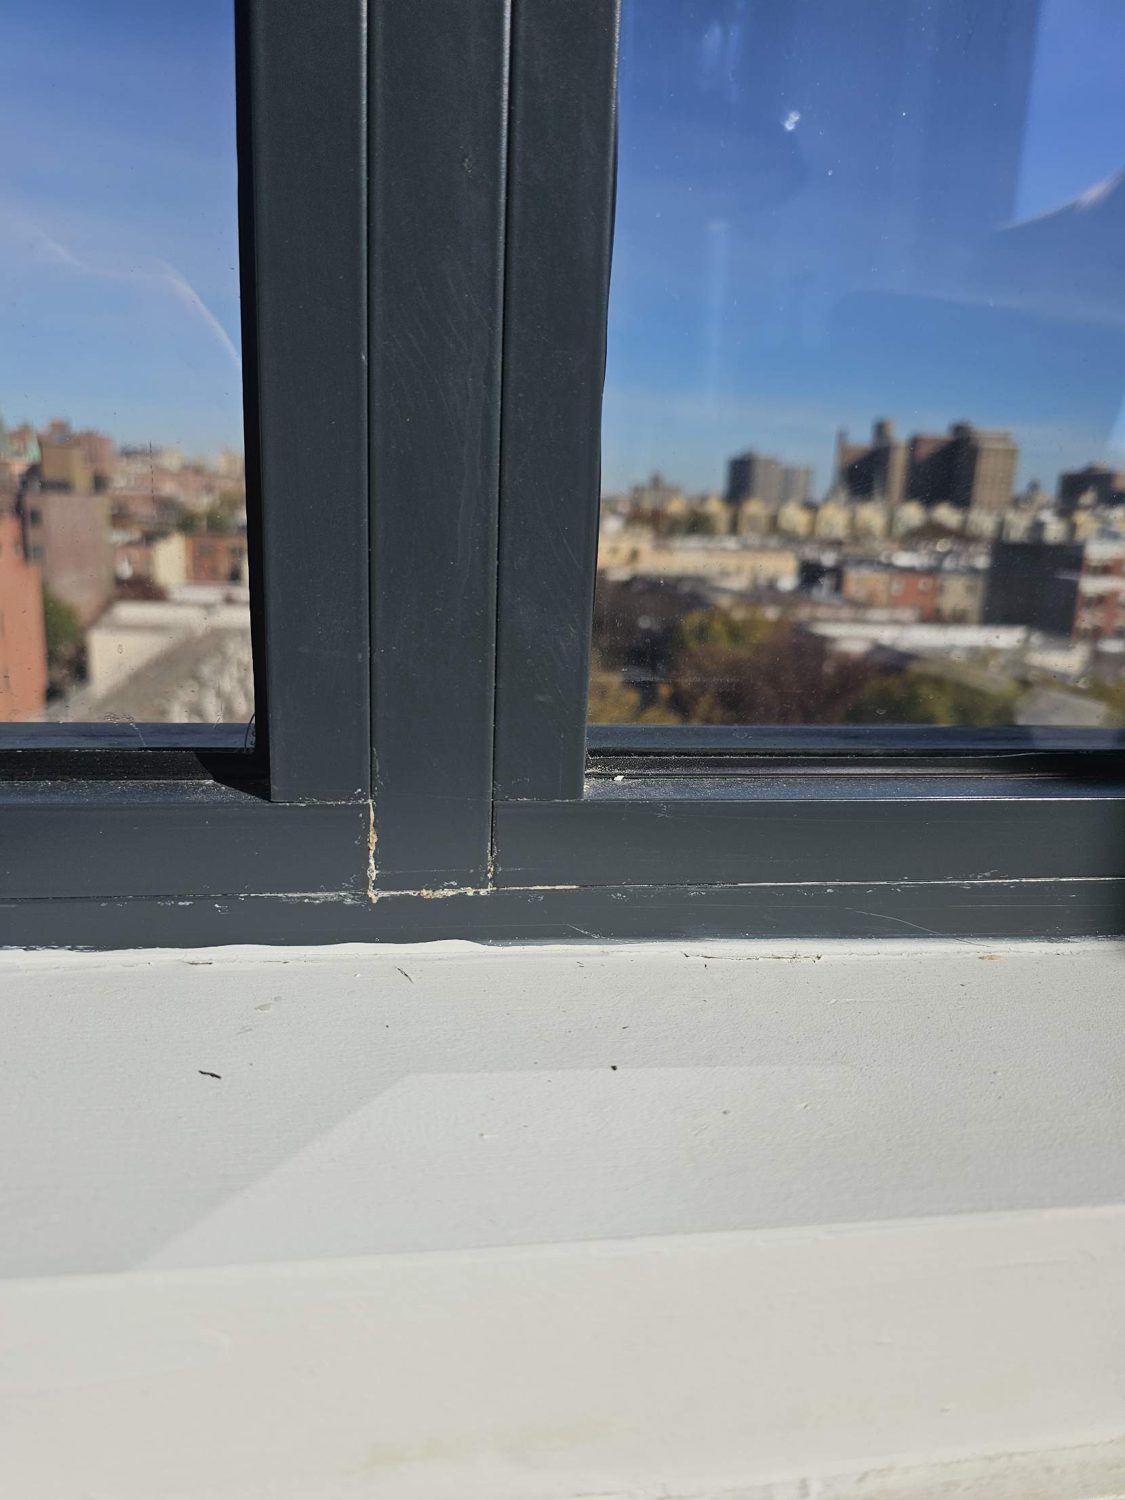
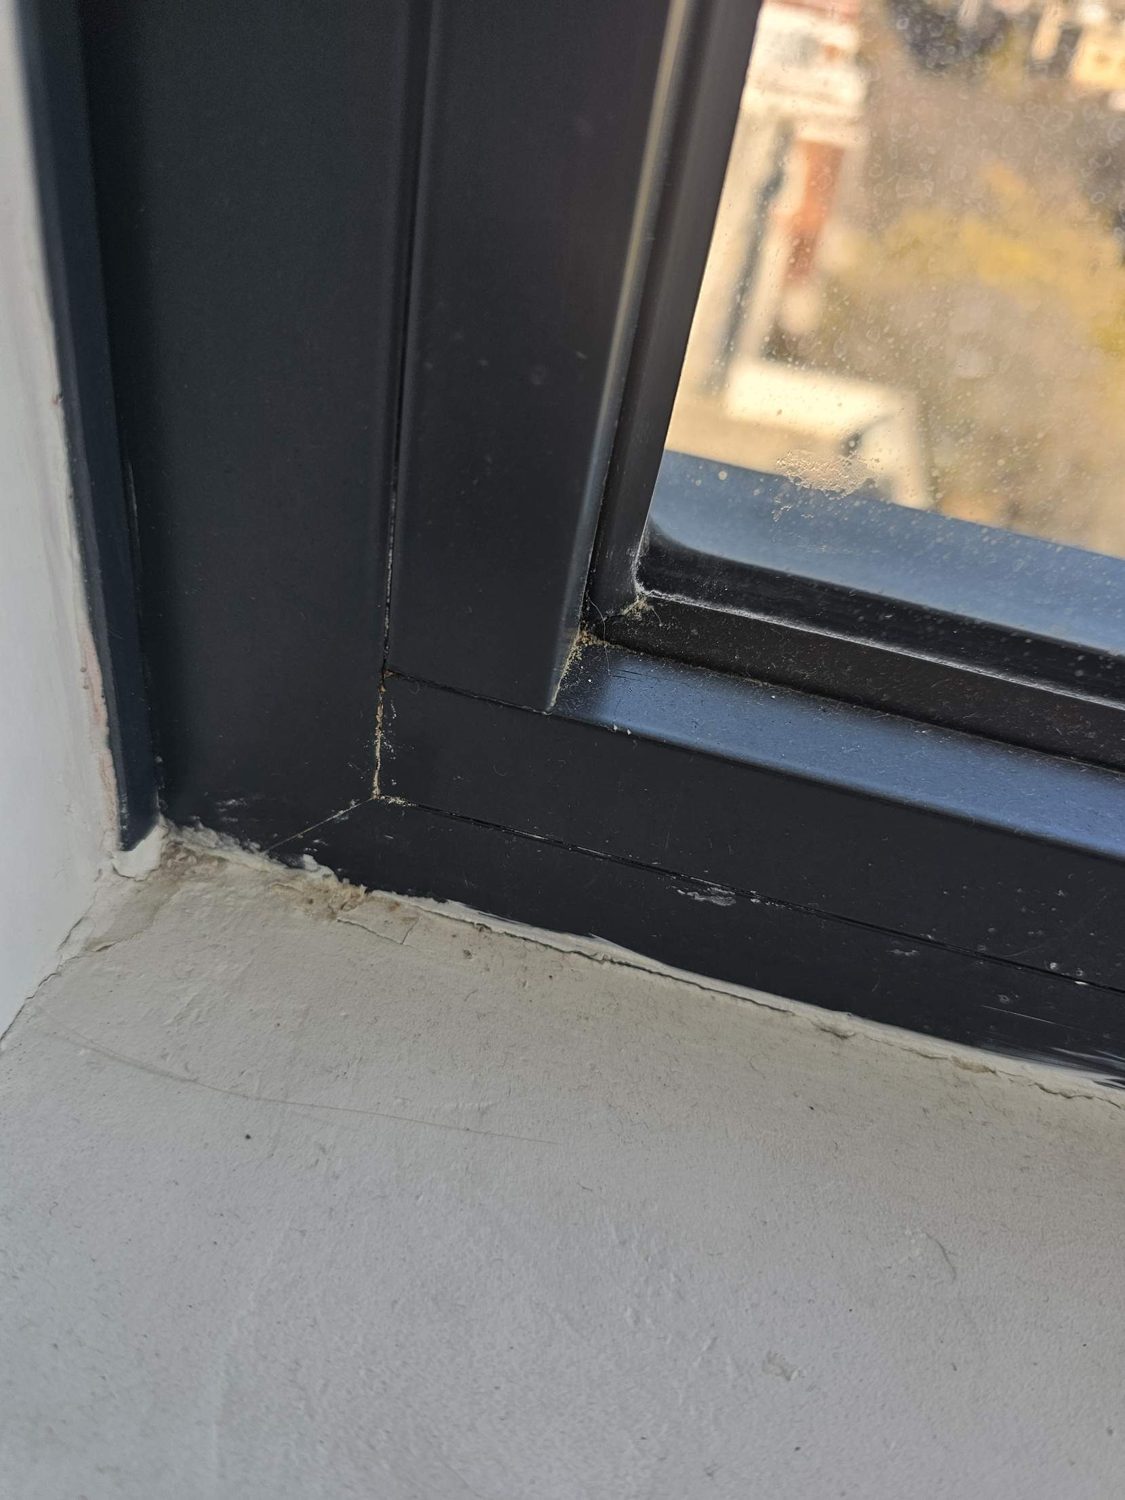
Two corners of the same lite, same kind of residue, both at the bottom. That pattern points at one mechanism: water is getting into the glazing pocket, the channel in the frame that the glass sits in, and instead of draining out to the exterior it is filling up and spilling over the interior stop. The entry point on the outside is a separate question, and on this visit it had not been confirmed.
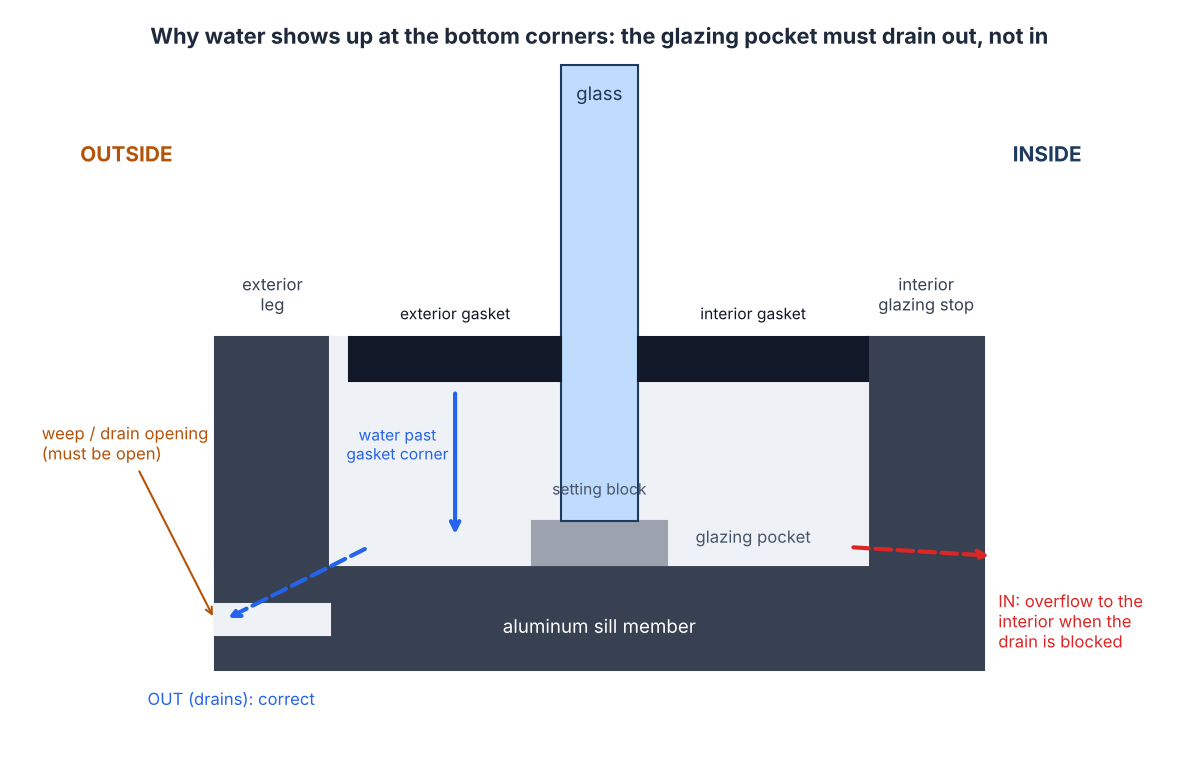
Aluminum windows and storefronts are not sealed boxes; they are drained systems. The exterior gasket keeps most of the rain out, but the design assumes some will get past it, especially at corners where two gaskets meet. That water lands in the glazing pocket, runs along the sill member and leaves through small weep openings on the outside face. The interior gasket and stop are a second line, not a dam. The system fails when:
All five are on the exterior or inside the frame. None of them is fixed by a bead of caulk on the interior sill, which is why the report says so in plain words: interior caulking will not correct this condition.
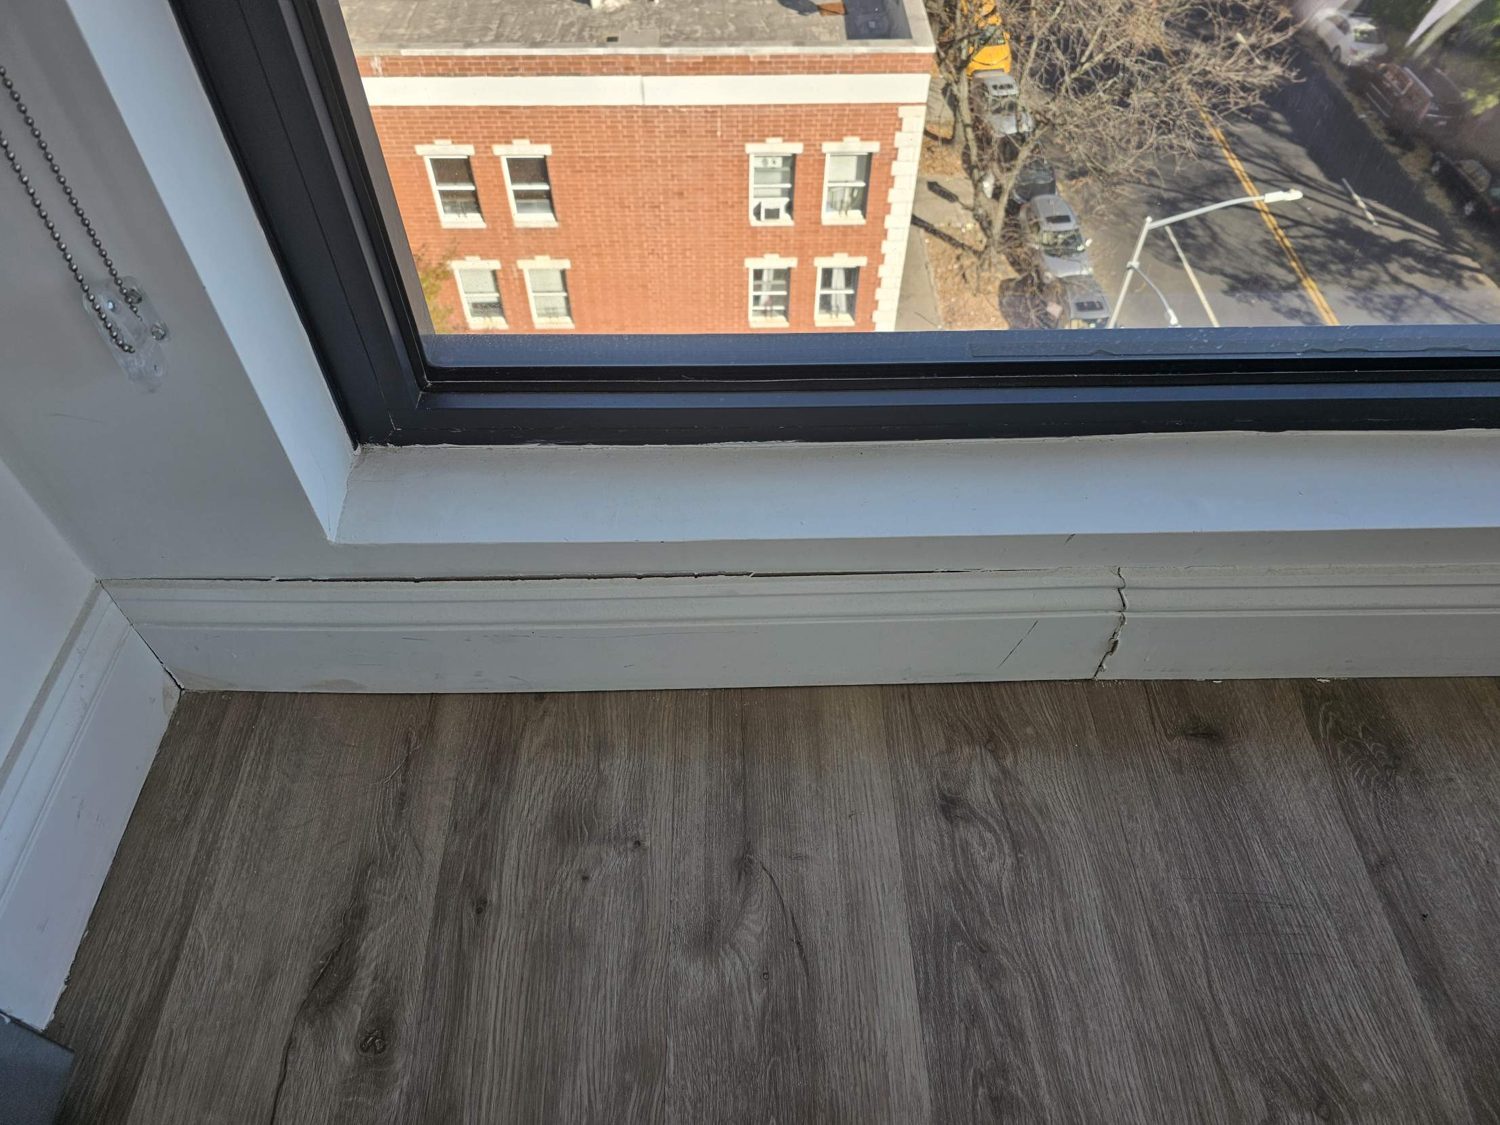
Below the left side of the window the baseboard has a gap at its top edge and a swollen, split butt joint. It is the kind of thing an owner points at as proof of the leak. Our assessment is wood expansion unrelated to the window, but an assessment is not a measurement, so the report recommends a moisture-meter reading of the baseboard and the wall below the sill before that is closed out. If the wall is wet, the leak has been running longer than the residue suggests and the scope grows.
The first visit is visual, from the interior, with no water test, no components removed and no exterior access, and the report says so under "Limitations." That is deliberate. A proper inspection separates what was observed from what is inferred, so that the repair is priced on facts. Concealed conditions inside the frame and wall were not seen; the findings and the scope may change after testing. An inspector who writes "replace the gaskets" after looking at a dry sill from inside is guessing, and the owner pays for the guess.
The report ends with six steps in the order they have to happen. Each one answers a question the previous one raised.
What the plan does not include is replacing the window. On a sound aluminum frame with a drainage or gasket failure, the repair is a service call with a lift, not a new unit, and the owner should expect the report to say which one before any money is spent.
| Where the water shows | Most likely cause | What to check first |
|---|---|---|
| Bottom corners of a fixed lite (this case) | Glazing pocket not draining; exterior gasket open at corners | Weep openings, pocket drainage, gasket corners |
| Base of a mullion | Mullion-to-sill joint seal failed, or water from a vent above | Joint sealant, vent gaskets and drains |
| Top of the window, head | Head flashing or perimeter sealant failed; wall above leaking | Exterior perimeter joint, flashing, masonry above |
| One jamb, mid-height | Jamb perimeter sealant or backer rod failed; frame anchor screw unsealed | Exterior jamb joint, anchor holes |
| Sill, spread along its length | Sill pan missing or without end dams; perimeter sealant at sill | Sill pan and end dams, sill flashing |
| Below an operable sash or door | Sash gaskets, weep slots in the sash, worn weatherstrip | Hardware adjustment, gaskets, sash-to-frame fit |
| Interior face of the glass, fogging | Failed insulated unit seal, not a water leak | Replace the glass unit, see insulated glass units |
If the window is new and the leak appears in the first season, the question is usually the perimeter waterproofing rather than the window; see leaking windows or failed waterproofing membrane.
A written inspection report with the property, unit and date, the reported issue, the inspection type and its limits, a description of the window, numbered findings with photographs, an assessment of the likely mechanism, and the recommended next steps in order. It is written so that a building manager, a board or an insurer can read it without us in the room, and so that the repair quote that follows can be checked against it line by line.
If a window, storefront or door is letting water in, schedule a leak inspection and send photographs of the wet area taken when it is wet, if you can; the location of the water on the day it rains is the most useful thing you can give us. We inspect and repair windows, doors and storefronts across the five boroughs, Long Island and New Jersey, including systems we did not install. See also storefront repair, waterproofing and property maintenance services.
By reading the pattern of the residue from inside (where it is and where it is not), checking the places that fail on that window type, and then running a controlled water test from the outside, one element at a time from the sill upward, while watching the interior.
Because the glazing pocket under the glass is where water that passes the exterior gasket collects. If the weep openings are blocked or the gasket corners are open, the pocket overflows to the interior at the corners.
No. Interior caulk is not a water barrier; the water is already inside the frame by the time it reaches the interior stop. The repair is at the exterior gasket, the frame joints and the drainage.
A small opening on the exterior face of the sill that lets water collected in the glazing pocket drain out. Painted or caulked over, it turns a drained window into a bathtub.
Spraying the exterior of the window in a controlled sequence, starting at the sill and moving up, while an observer inside watches for water. It isolates which element is letting water in.
To see the inside of the pocket: standing water, debris, and whether the drainage openings are present and clear. It is the only way to confirm a drainage failure without guessing.
Usually not if the frame is sound. Drainage, gasket and joint failures are repaired on a service call with exterior access; replacement is for frames that are corroded, deformed or missing a sill pan.
Not by itself. Wood movement does the same thing. A moisture meter reading of the baseboard and the wall below the sill settles it.
Property, unit, date, reported issue, inspection type and limits, window description, numbered findings with photos, an assessment of the likely cause, and recommended next steps in order.
Yes. Across the five boroughs, Long Island and New Jersey, for owners, managers, boards and insurers.
Storefront repair Waterproofing solutions Window and door waterproofing: sill pan, head and jamb flashing Leaking windows or failed membrane Sliding patio door draft inspection Property maintenance services Window hardware
About this page. Written by Alex GC Inc. d/b/a Alex Glass Construction and reviewed before publication by Aleksandr Chernovolenko, Managing Partner, with our design and estimating lead and a field foreman. Our foremen hold the NYC DOB Site Safety Training supervisor card and our crews the 40-hour worker card; we are certified to fabricate, install and service Alutech and Everest aluminum systems. Facts are drawn from our own projects, manufacturer test data and the applicable codes; where we are giving an opinion, we say so. Last reviewed November 2026. Credentials
Send photos of the wet area, ideally taken while it is raining. We inspect, write it up, test, and repair; replacement only if the frame has failed.