A self-adhered membrane is only as good as the surface under it. On a site visit this week the sheathing had been left proud of the jamb by a small lip, and that lip was enough to stop the waterproofing. Here is what the opening has to look like before we will flash it, and what goes wrong when it does not.
In short: Before a waterproofing membrane goes around a window opening, the rough opening has to be a flat, continuous, clean surface: sheathing cut flush with the jamb, sill and head faces; no lips, steps, gaps or proud screw heads; dust and loose material removed; and the inside corners either filled or treated with a corner piece. A self-adhered membrane bonds only where it touches. Any lip or step holds it off the substrate and leaves an air pocket behind it, and an air pocket is a tunnel for water into the wall. When we find an opening in that state, as in the photo below, we stop, mark it, and have the sheathing trimmed before the flashing starts.
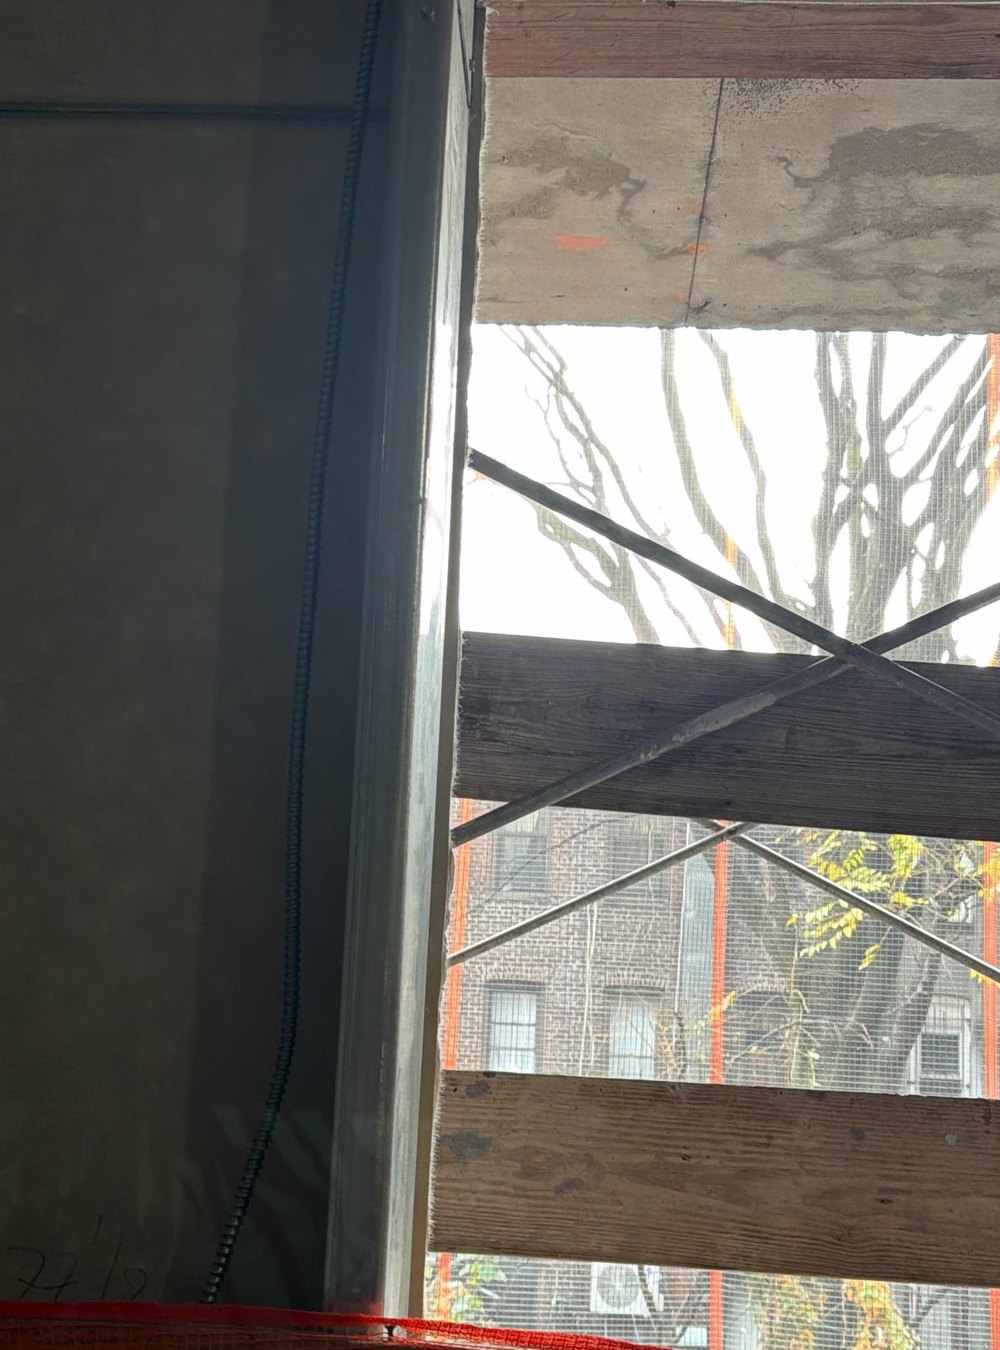
This is a jamb in a new building we surveyed this week. The exterior sheathing (a glass-mat gypsum board, DensGlass in this case) was not cut back to the line of the jamb; it stands a small distance into the opening. It looks like nothing: a quarter inch, maybe less. But the waterproofing crew could not install the membrane, and they were right not to try.
The membrane has to run along the exterior face of the sheathing, turn the corner, and continue down the jamb return into the opening. That corner must be a clean 90 degrees. With the lip in place, the membrane turns the corner at the edge of the lip, not at the wall, and from there it is held off the jamb for the height of the lip. The adhesive never touches the substrate in that band. That is the air pocket.
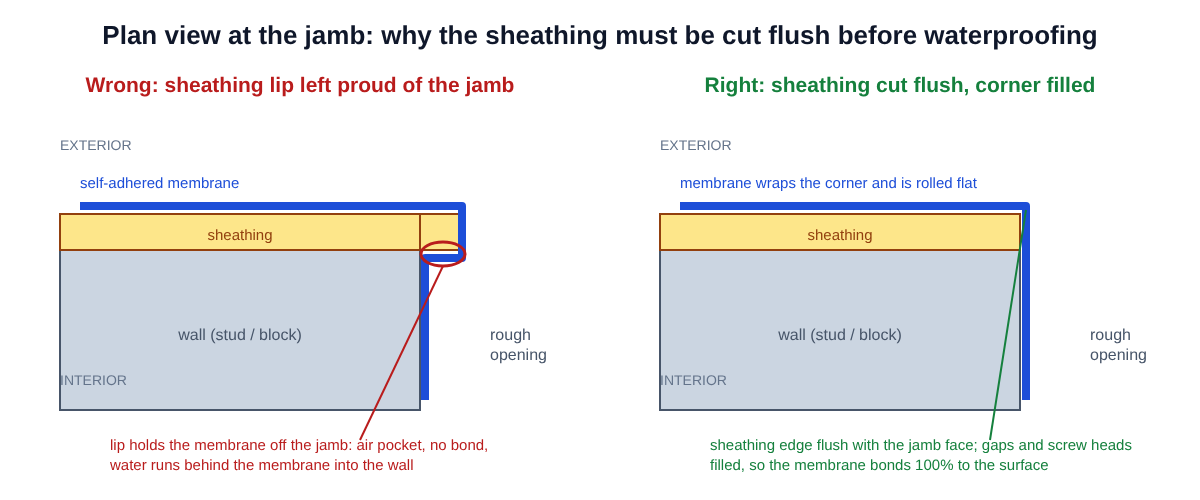
A self-adhered flashing membrane does three things: it sheds water that gets past the cladding, it seals around every fastener that goes through it, and it gives the window frame's own sealant a continuous surface to bond to. All three depend on full contact with the substrate. Where the membrane bridges a gap:
The problem does not show for a year or two. By then the cladding is on, the interior is finished, and the water shows up as a stain on a ceiling two floors down. Finding and fixing it costs more than the window did.
When we survey an opening before flashing, this is the list. The general contractor or the framer prepares the opening; we check it before the membrane goes on, and we will not glaze an opening that was not flashed on a surface like this.
The lip in the photo happened because the sheathing was hung as full sheets over the framed wall and the openings were cut out afterward from inside, with the saw following the framing by feel. That is normal practice; the mistake was not following it with a second pass to trim the edge flush from outside. The sequence that works:
When we find an opening that is not ready, we photograph it, mark the opening number on the sheathing, and send the list to the general contractor the same day. On this job the fix is ten minutes with a saw per opening. The alternative, finding it after the glass is in, is a wall opened from outside.
This is the same whether the window is aluminum, uPVC, wood or steel, and whether the wall is stud and sheathing, block, or concrete. On a masonry wall the equivalent of the lip is a mortar snot or a brick set proud at the jamb; on concrete it is form fin at the edge of the opening. The rule is the same: flat, flush, clean, dry, then membrane. We work this way on every job in New York City, Long Island and New Jersey, from a single window replacement in Brooklyn to a whole-building package for a builder in Queens. For the materials themselves, our supply site NYCE Glass stocks flashing membranes, primers and sealants.
The sheathing must be cut flush with the jamb, sill and head on all four sides; the surface must be flat with no lips, steps, gaps or proud screw heads; inside corners filled or fitted with corner pieces; and the substrate clean, dry and primed if the membrane requires it.
The membrane bonds only where its adhesive touches the substrate. Any lip or step holds it off the surface and leaves an air pocket, which is an open path for water behind the membrane and a place where fasteners and sealant cannot seal.
Water that gets behind the cladding runs into the void and into the wall; the unbonded membrane relaxes and opens further; screws through it are not sealed; and the manufacturer's warranty does not apply. The leak usually shows up a year or more later as a stain inside.
No. The membrane will bridge the lip, not conform to it. The lip has to be cut off so the corner is a true 90 degrees before the membrane goes on.
DensGlass is a glass-mat gypsum sheathing used on the exterior of steel-stud walls in New York. It is cut after the wall is framed, and if the cut is not trimmed flush at the openings it leaves exactly the lip shown in the photo. Many membranes also require a primer on gypsum sheathing.
Normally the framer or general contractor prepares the rough opening and the waterproofing trade flashes it. As the window installer we check the opening before flashing and before installation and report anything that is not ready.
After. Trimming the sheathing changes the opening size, and the size that goes to the window factory must be the final one.
Yes. The equivalent defects are mortar left proud at the jamb or form fin at a concrete edge. The surface still has to be flat, flush, clean and dry before the membrane.
How we measure a window opening How we evaluate a glazing job Installation services Aluminum windows Glass contractor for builders
About this page. Written by Alex GC Inc. d/b/a Alex Glass Construction and reviewed before publication by Aleksandr Chernovolenko, Managing Partner, with our design and estimating lead and a field foreman. Our foremen hold the NYC DOB Site Safety Training supervisor card and our crews the 40-hour worker card; we are certified to fabricate, install and service Alutech and Everest aluminum systems. Facts are drawn from our own projects, manufacturer test data and the applicable codes; where we are giving an opinion, we say so. Last reviewed November 2026. Credentials
Send us photos of a few openings before the waterproofing crew arrives. We will tell you what needs trimming, filling or priming, and survey them for the window order once they are ready.